Christian Louboutin Decollete 554 100 Patent Nude Review

img_5573

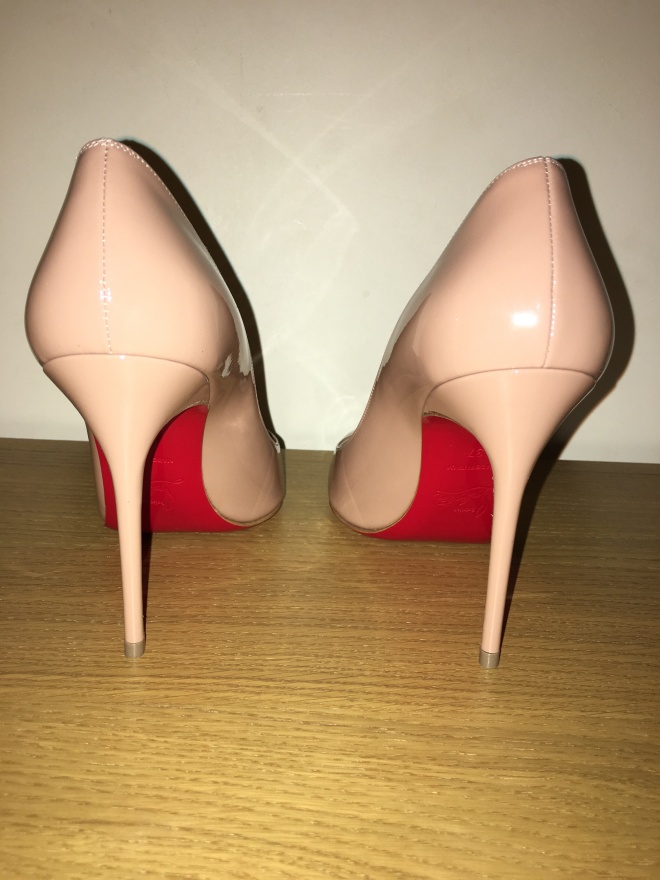
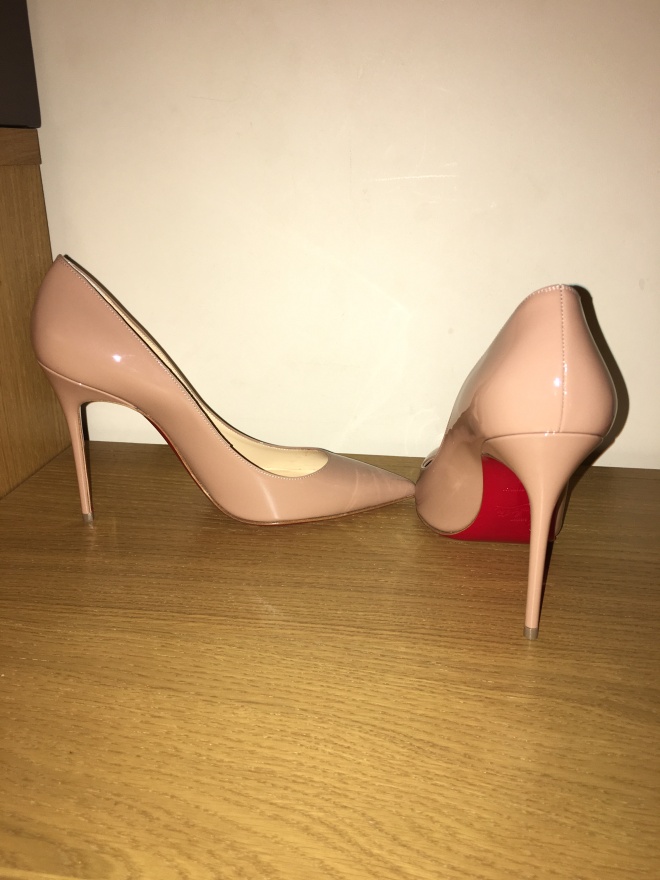
So here it is, the beautiful Decollete 554 100mm in Patent Nude.

So this is actually my second pair of loubs and they are absolutely GORGEOUS!

I went for the nude colour as my other pair are black – nude and black go with pretty much any outfit, fact. No one can deny that surely? I went for a 100mm heel as I was thinking about being practical, they are easy to walk in (for me) and therefore will get more use out of them compared to a 120mm heel.

`You will see they are similar to the pigalle but with just a few differences which I will go through. I will be comparing them to the pigalle which are one of the standard most popular design:

  • The heel is thinner and more of a pencil heel than the pigalle, which you might say makes them a little harder to walk in but in my opinion makes them look a little sexier than the pigalle. When I tried these on at the same time as the pigalle there wasn’t much difference for me, but this is coming from someone that wears heels every day, so a little bit of a skinner heel doesn’t make s massive difference for me.

img_5617

  • The fit of the shoe itself and the toe box is narrower. If you have wide feet, these are not the shoe for you. I have narrow feet and they fit perfect width wise. I struggle with non designer shoes as a majority are too wide for my feet, that’s how narrow my feet are. I’ve heard that the toe box stretches with wear, this is yet to happen to me on either of my loubs but maybe because I have narrow feet, there’s nothing making them stretch? Just food for thought.

img_5619

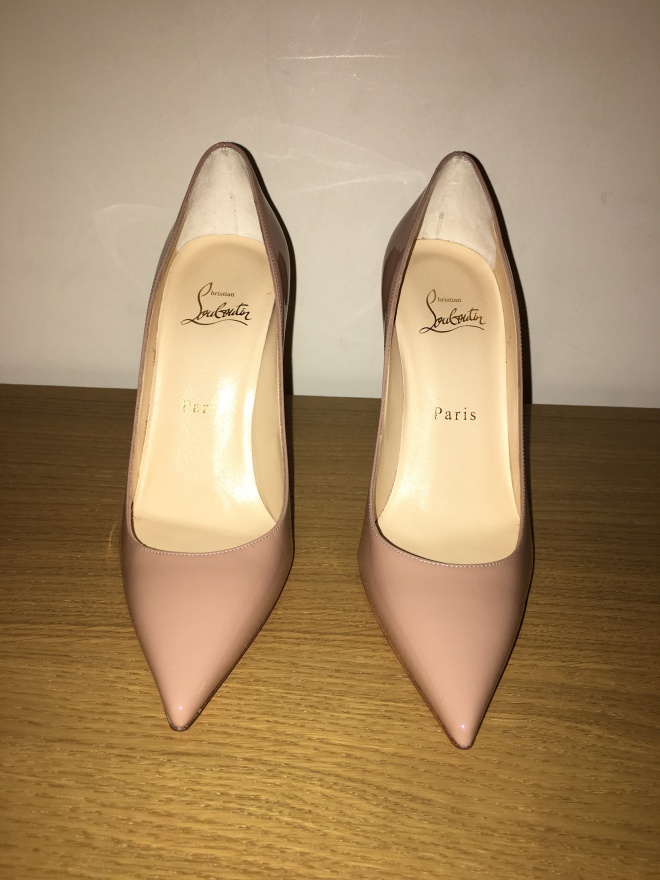
  • The toe box is longer than that of the pigalle. This actually helps me as I have quite long toes (interesting fact? gross more like) and therefore it gives that little extra room for your toes to stretch a little. It is debated between people whether this makes a difference or not, I think it does in my experience.

img_5618

I love love love these Decollete’s and I chose them over the Pigalle’s, because of the reasons above. That is not to say I would never buy the Pigalle’s though, they’re still a beautiful shoe.

I bought these from Selfridges in Manchester, where the service was great and would definitely recommend purchasing from there!

Thank you for reading my lovelies!


Saving – How I do it?

Hi everybody, now as I’m writing this post I’m thinking that surely a majority of people reading this post will be thinking they need to be saving money too!

Well I’m going to tell you the one and only way that it works for me…

IMG_1512_Fotor

So this is my ‘piggy bank’ so to speak. I know everyone will be thinking, ‘well I’ve tried this and it doesn’t work’. All you need is self discipline and you can do it! Anyone can.

It says on the front ‘This money pot is for hopes and schemes, To help you save for all your dreams’

This piggy bank is one that you have to smash to be able to open, so you can’t be stealing money from it once you’ve put your money in. This is the only reason this works for me. This money soon builds up and once it’s full and you smash it open, you know you’re going to have quite a bit of money in there. Speaking of which I only put £1, £2 coins and notes in here to make it worth it!

This specific piggy bank claims that if you fill it to the brim with £2 coins then it should be holding roughy £1000! This piggy bank cost me £10, so fair enough, you’re technically losing £10 when you smash it, but at least you’ll have saved ALL of that money in the mean time. I’d rather save up £500 + than save £10 on not buying the piggy bank at all! There’s so many different designs you can get as well! I would recommend this to anyone trying to save but keeps divulging in their saved up coins, so savings keep going up and down.

How do you save? Let me know in the comments below!

Thanks for reading xx

My MAC Lipstick virginity is broken!

IMG_1438 IMG_1437

Hello everyone, I have an announcement for all of you that I’m proud to say – “my MAC Lipstick virginity has been broken”!

So I’ve never been a massive lipstick lover, and I’m pretty sure I’ve owned no more than 5 lipsticks in my lifetime! Well last year I started to delve into lipsticks, and by delve I mean I bought ONE lipstick! Seemingly, I fell in love and have bought the odd lipstick here and there to add to my collection for different seasons/occasions…

And then it happened…I was in Covent Garden in London a week ago and I went passed a MAC shop, I’d never been in an actual MAC shop before, had no intention of buying anything but wanted to have a browse. My make up collection that I have from MAC is very small and I had no intention of making my collection any bigger. That was until I saw all of the lipsticks lined up so beautifully, every colour you could think of! I saw a few that I liked, but one distinctively stood out as it matched my nails and it was a colour I loved for this time of year!

This colour was ‘CAPTIVE’ and it was part of the ‘Satin’ collection of the lipsticks. I tried it on with my finger to make sure it would suit me, and loved it. Now I’ve heard loads of people in the past saying “whats the point in buying a lipstick for £15 odd when I can buy the exact same colour for way cheaper from another brand”. Well to all of you that think that, which I can understand why you do because I once thought that too, it’s the quality of the lipstick you’re paying for. This lipstick does not budge from my lips, it doesn’t transfer onto glassed when I have a drink, it keeps it’s colour, doesn’t go patchy, it’s immaculate. And the packaging is b-e-a-utiful! Needless to say, I will definitely be buying another MAC lipstick the next time I want a different colour for whatever reason.

What are your favourite MAC lipstick colours? What are your thoughts? xx

P.S. Ignore the bad nail varnish in the photo, it was due to come off as it had chipped a lot.

My Handbag Essentials – Ft. Ted Baker

IMG_1278_Fotor

Afternoon my lovelies, today I wanted to share with you all my handbag essentials that I carry round with me on a day to dat basis. Half of these products I use on a daily basis and the other half or more emergency products/items but nevertheless they are still my handbag essentials.

I carry these items in the Ted Baker pouch in the photo inside my handbag. I use this pouch to make my handbag look more organised, as opposed to before where everything was just scattered at the bottom of my handbag lost for all eternity like some kind of Mary Poppins wander bag! This Ted Baker pouch came with my Ted Baker handbag which I’m sure I may show to you all at some point so I wouldn’t know if this pouch is purchasable by itself and if it is, how much it would be. So let’s begin!

  1. Hair Grips – this is a standard in many girls handbags I’m sure! I’m surprised I’m organised enough to have them still on the packaging rather than scattered about my bag. I actually put the hair grips back on the packaging as well when I’m not using them so I don’t risk losing as many as I normally would. I keep these in my handbag because for work I wear a bun and more often than not my hair tries escaping from my bun so these come in useful when I need to tidy up!
  2. Elemis Jasmine and Rose hand and nail cream – This is my holy grail hand cream. Smells absolutely gorgeous and your hands aren’t all sticky after applying them, they’re soft and moisturised. Now that it’s coming towards the colder seasons the hands are getting more and more dry so I’m already using this almost every day.
  3. Mineral Magic Pressed Powder – This is a powder that I use to touch up if I need to in the middle of the day depending on how my make up is looking. I keep this powder in my bag because it’s not the type of powder leaving you with a cakey look meaning it’s perfect for touch ups and you never know when you’re going to need to touch up!
  4. Nail clippers – For when I break a nail at work is when I usually need these. It’s rare that I do but they come in so handy at removing a half broken nail before it becomes any more damaged.
  5. Nail file – this kind of goes with the nail clippers. Sometimes when you break a nail, it becomes jagged and scratchy so a nail file is perfect to smooth the nail out on the go.
  6. EOS Lip balm – This is my go to lip balm, I’ve previously written a blog post on this already, absolutely love it! Again, with the colder seasons chapped lips are starting to show themselves so this I’m also using almost every single day.
  7. Tablets – I know what you’re thinking. You’re looking at the photo and saying to yourself ‘there’s no tablets in that photo!?’. Well actually, the little coin purse that you can see is actually carrying a variety of tablets that I have cut up in their packs. These are for emergency’s, aches, pains, stomach issues etc. The worst thing I can think of is going out and falling ill or getting a headache! Pulls the fun out of everything! So for this reason I always carry tablets around with me so I can try and get rid of any problems I have asap rather than waiting to get home and being in more pain as well as having your day ruined! These are the biggest MUST in my handbag essentials!
  8. Kleenex Blotting Papers – These are amazing! I have very oily skin and so sometimes I have to blot my skin to dab away the excess oils without needing to touch up to cover the oil. They’re amazing because you can use these to get rid of the excess oils and your make up is still intact! I struggle to find these in the shops nowadays, so I now order them online because I love them so much!

So that’s my day to day essentials that are a must in my handbag!

What are your handbag essentials? Do any of you use the same things as me? Let me know you’re thoughts!

Thanks for reading 🙂 x

My September Specific Favourite – Elemis Forever Frangipani Gift set

IMG_1257_FotorIMG_1217_Fotor

I know it’s a little early to be claiming what my favourite product/set of September is as the month isn’t even over yet, but I am so confident with this set that I am 100% certain nothing can top this in a matter of a week or so.

So it was my birthday at the beginning of September and I was treated to a spa getaway for a weekend, at which I also had the luxury of two treatments: Full body massage and a facial, both of which I had the Elemis specific treatments.

The oil in the above gift set is what was used for my full body massage and I absolutely loved it so I decided to purchase the above gift set whilst I was there! The gift set cost £39, and I’m telling you this because I’ll be telling you the prices below as if buying the products separate so you can see what a bargain it is! This gift set is actually part of the christmas gift set range which has already started coming out! (I just wanted to point out, I am not sponsored to talk about Elemis products, these are products I have found and genuinely fell in love with – more of an obsession if I’m honest).

IMG_1248_Fotor

Frangipani Monoi Shower Cream – So as it says, this is a shower cream and a luxurious feeling one at that. It is a lovely creamy consistency that is beautifully moisturising. I just put a little amount in the palm of my hand, lather it up in my hands a little and rub it all over my body. I absolutely love this and was pleasantly surprised as I’m not usually fussed what body washes I use. This product by itself would be £24 which for me is too expensive for a shower cream and so this is not something I would buy on its own but I will honestly be gutted once it has ran out.

IMG_1254_Fotor

Frangipani Monoi Body Oil – As I said at the start of this post, this oil was the oil used in my full body massage. This is actually a hair, nail and body oil so it is multi purpose which I love. For me I only use it as a body oil and obviously I am unintentionally using it as a nail oil as it gets on my nails when I use it which I am not complaining about. I love how nourishing this body oil is, I use this once a week for a more deep moisturising treatment for my body but it can be used however often a person wishes. This body oil costs £34.

IMG_1251_Fotor

Frangipani Monoi Body Cream – This body cream I use day and night and I can 100% say this is the best body cream I have ever tried in my life. I actually never used to like moisturisers all that much as a majority that I tried sat on top of my skin and was sticky rather soaked in. This body cream is definitely a re-purchase as it soaks in to the skin, so you feel silky smooth and soft to the touch rather than a sticky mess. Cost is £24.

IMG_1252_Fotor

Frangipani Monoi Mist – This is actually a room mist, however I was told in the store it can also be used as a body mist, however I use it as a room mist. The only thing with this product is it comes out quite strong, which is a good thing because then you only need to use one squirt, but I still think this is too strong for a small room. This is however perfect for an open planned room when you want a nice scent, perhaps if you have visitors coming over or you want to get rid of the smell of a take away you’ve just had. Personally I don’t often use it but it does smell nice in small doses. I actually couldn’t find this product on the Elemis website at how much it would cost separate so I’m not sure on this one.

All of these products smell absolutely beautiful! Especially on the body! Personally I’d never heard of Frangipani so the first time I’d heard of it and smelt it was at the spa. The body cream and the oil are my favourite products in this gift set. As you can see, if you’re a person interested in these products, the gift set is the best way to go as the products separate amounts to quite a bit of money. I will definitely be re-purchasing a couple of these products and I would definitely recommend these products to everyone 🙂

Thank you for reading xx

11147267-1294325686928814

What’s in my make up bag? – Ted Baker


IMG_1232

Hello my lovelies, I wanted to share with you what is in my make up bag. These are my essential products that I use on a day to day basis, these products are the same products that I use every day and never change.

IMG_1233

I use these 2 products at separate times throughout my foundation routine. I use the B6 Vitamin-infused complexion prep spray as my 1st step, this helps to reduce redness, minimise pores and absorbs excess oil on the skin – basically prepping the skin ready for your routine. The de-slick make up setting spray is a setting spray specifically to help with oil control, I actually spray this product onto my foundation brush before applying my foundation, that way the setting spray is mixed in lightly with the foundation and in my opinion works better as a setting spray.

IMG_1021

This Urban Decay Naked Skin beauty balm is what I use as my primer. It helps to blur out imperfections, it’s oil free and primes the skin ready for foundation. Before I use this, I do use my EOS lip balm, which I haven’t taken a photo of as I already have written a blog on it.

IMG_1234

Next items I use are my Urban Decay naked skin foundation and I use it with the Urban Decay Optical Blurring brush. This brush is specifically best used with this foundation, both of which I am in absolute love with. I have already done a review on both of these so I won’t go in to detail, but one thing I will say is that a setting powder is not required with this foundation which is why you won’t see a setting powder in this post.

IMG_1236IMG_1237IMG_1240

Above is the 2 next things that I use, I use the Bare Minerals bronzer in the shade ‘The Skinny Dip’ (left) to contour my face, this is the perfect shade bronzer for my skin and blends in perfectly! I then use the Mosaic Bronze Glow in the shade ‘Sunkissed’ on the top of the cheek bones to give my skin that extra little bit of glow/shimmer. The brush I use with these is the Blush/Contour brush by B.

IMG_1238

This is the mascara I am currently using, this is not normally the mascara I would purchase, however I never stick to one mascara. This is the first one of this brand I’ve tried and I was pleasantly surprised with it being such a cheap mascara. It isn’t clumpy and it also dries quick which in my eyes is a good thing. The eyelash curler above is by Tweezerman, this is really good at curling the lashes which I use every day before using the mascara as you’d probably guess.

IMG_1239

Lastly, this is the Loreal Le blush in the shade ‘True Rose’. I have used this blush for almost a year and still haven’t hit base. It’s the perfect blush for me as like the bronzer suits my complexion and blends in perfectly. The brush I use with this is the Real Techniques contour brush.

All of these products like I said I use every single day, the only product that differs is my choice of lip gloss/lipstick. Therefore I have left out the lipsticks all together. I quite often go for a neutral look so eye shadows are very rarely a part of my collection.

I hope you enjoyed reading this post, what’s in your make up bag? Do any of you use the same products as me? Let me know 🙂 x

Cosmetic Warrior – the perfect mask for acne prone skin?

lush-cosmetic-warrior-2

So i’ve never been a massive Lush fan, I’ve only ever owned about 2 products from Lush ever, maybe 3 and I thought maybe a ‘natural’ face mask was the next way to go as opposed to chemicals etc.

So I headed on down to my local Lush store and had a little gander round the store. I was specifically after a face mask more than anything so was specifically wondering around that little section. I then came across this bad boy, called ‘Cosmetic Warrior’.

This gentle face mask combats spots and soothes troubled skins. With antiseptic fresh garlic, tea tree essential oil, deep cleansing kaolin and antibacterial honey. Use it to banish breakouts.

So after reading this I thought perfection! That sounds exactly what I need to help aid my skin. So I made the purchase, took it home, put it in the fridge as advised until trying it a few days later.

Apparently you’re supposed to apply the mask, so that you’re covering you’re entire face with the mask just enough so that you’re skin isn’t showing through. That being said it aims to get about 6 uses out of it roughly, using this mask once a week would mean you get 6 weeks use out of it (according to the Lush staff member that helped me out).

So I applied the face mask, which to my dismay, smelt even worse to me when it was sat on my face. You’re supposed to leave it on for 10 to 15 minutes. For me I could only last 10 minutes as the smell was overpowering. I don’t normally have a sensitive nose but this had a big impact on my thoughts for this face mask. However, the actual face mask results I was pleasantly pleased with, my skin felt smooth, moisturised a refreshed, and after a few weeks of using it my blemishes had reduced.

The only problem I have is the smell and for this reason alone I won’t be re-purchasing the product. Out of all of the other face masks this is basically the best one for my skin, which is such a shame when some of them smell beautiful and I’m walking around smelling like a garlic.

If you don’t have a sensitive nose or you generally don’t mind the smell, then this face mask is worth it. Putting on natural products to help combat your skin is one of the best things you can do!

P.S I’m not trying to put anyone off with the garlic, I have friends that didn’t think it smelt that bad so it could just be me!

EOS Lip Balm – My thoughts?

IMG_0941

This is going to be a small post, but I wanted to share my thoughts on this lip balm.

EOS (Evolution of Smooth) lip balm has always been a well known lip balm in places such as America, however they were never sold in stores in the UK for a long while. I have seen these on reviews and youtube videos and always been curious at what the hype was about as so many people had them.

I eventually but accidentally came across this lip balm whilst purchasing some items in topshop, it was on the counter with many flavours and I just couldn’t resist. At £6.99 I purchased this lip balm in the Pomegranate Raspberry flavour as it was the one that smelt the best to me.

I’ve been using this lip balm for almost 2 months now and I still can’t see signs of any use. The flavour is subtle on the lips, it moisturises the lips for a long amount of time as the consistency is thick but not sticky. It also doesn’t rub off as soon as your lips touch something or as soon as you have a drink like some lip balms do and it also makes a perfect lip base for lip sticks and lip glosses. I was surprised at the quality if I’m honest as I normally always find something wrong with a lip balm and get to annoyed to continue using them. However this is a great lip balm for the price and I can tell is going to last a very long time!

I would recommend this lip balm to anyone looking for a good lip balm. There are even sets online that you can purchase so you can get a selection of flavours so you don’t have to wait for it to come to a store near you like I did!

Clarisonic Mia 2 – REVIEW

IMG_0972IMG_0973

So my discovery of the Clarisonic came from finding them in cleansing routines on Youtube and found that this was used in quite a few peoples routines. For your information I actually live in the UK and the Clarisonic was not in any shops therefore I’d never seen or heard anything about this before. The more I saw it the more curious I became so I started to look into it and after reading reviews about it I started to become very interested.

A month or two after the discovery I went to Dubai for my birthday and found it in a Sephora in a shopping mall over there so I decided to take the plunge and make the purchase. It took me a whole day to decide whether to buy it or not as it doesn’t exactly come cheap but after everything I read I decided I wanted it and knew I’d regret it once  I got back to the UK if I didn’t buy it.

This was bought in September 2015 and I have used it every day since, I take it with me when I go away, stop away for a night, no matter what, it comes with me and it has been a god send. It removes all make up leaving skin cleansed and the bristles are soft against the skin.

I purchased the deep pore cleansing collection range as a part of my Clarisonic which came with the following:

  • Deep Pore Cleanser
  • Deep Pore congestion clay mask
  • A case and cover that it is stored in to keep safe which can be seen in the photos
  • Magnetic charger

IMG_0971

Magnetic charger explained – As you can see on the photos there is no holes where a charger can be plugged in, this is because the magnetic charger attaches itself to the front of the handle to charge up, the reason for this is with it being a cleansing electronic device it would be unsafe to have ‘exposed’ ports. This amazing feature makes the device waterproof

Overall, I love my Clarisonic, it has interchangeable heads so you can purchase different type heads and put new ones on every few months to stay fully cleansed, the battery lasts a while, it has it’s own case for travel and storage purposes and lastly cleanses my skin thoroughly!

For those of you who in live in England or somewhere this is not sold, it can now be ordered on Boots website now, which they started doing a few months after coming back from Dubai. It honestly is worth the money, they have a variety of brush heads, I use the ‘Sensitive’ skin brush heads but only because the less abrasion against my skin the better. I do moisturise every morning and evening so I am restoring the nutrients in my skin as well.

This was money well spent and skin well looked after!

Another note as well that I want to point out, you can get a variety of different brush heads for the clarisonic as it is interchangeable. There are brushes to suit all skin types, as well as brushes for body exfoliation depending on what you want to use it for. It is recommended to change the brush head once every 3 months. I use the Deep pore brush head as shown below as it is best for minimising pores and best for oily skin.

IMG_1089